

- You have no items in your shopping cart
- Subtotal: $0.00


The surging popularity of cannabis cultivation has been fueled by state-level changes to cannabis legality. As more and more states adopt some levels of recreational or medicinal cannabis legislation, more potential growers are being introduced to the fray.
Today, the cannabis market is surging in size, value, and popularity. Leading the charge are seed banks that have taken it upon themselves to supply their clients with the right marijuana seeds for successful at-home cultivation.
One of the easiest ways to get into cannabis cultivation is through the use of Autoflower Cannabis Seeds.
Let’s explore autoflowering cannabis seeds to better understand what they are, how to grow them, and what we can expect every week.
What Are Autoflowering Cannabis Seeds?
Considered Day-Neutral (DN), Autoflowering Cannabis seeds will automatically begin to flower after roughly three to four weeks of growth, irrespective of the photoperiod of the plant. While an autoflowering plant sounds a little closer to magic than reality, the roots of this power can be traced back to a subspecies of cannabis known as the Ruderalis.
Introducing the Ruderalis
The Ruderalis strain of hemp first gained notoriety after it was discovered in Russia during the early 1940s. The discovery of the plant and its corresponding development would dramatically change the way we face home cultivation.
Wild and uncultivated plants, such as the Ruderalis, developed autoflowering traits to better adapt to the short and harsh growing conditions of the region. This allowed the Ruderalis plant to expand far beyond its original range, thriving throughout Russia and into Siberia.
Creation of Autoflowering Strains
While ruderalis plants have little if any THC, they are the crossbreeding foundation upon which our autoflowering marijuana strains are created. When crossed with a traditional marijuana strain, the ruderalis will impart its autoflowering capabilities while the traditional strain will provide the THC levels and genetics that cultivate the broader experience.
The benefits of an autoflowering strain are simple: they take the guesswork out of cultivation by automating the flowering process.
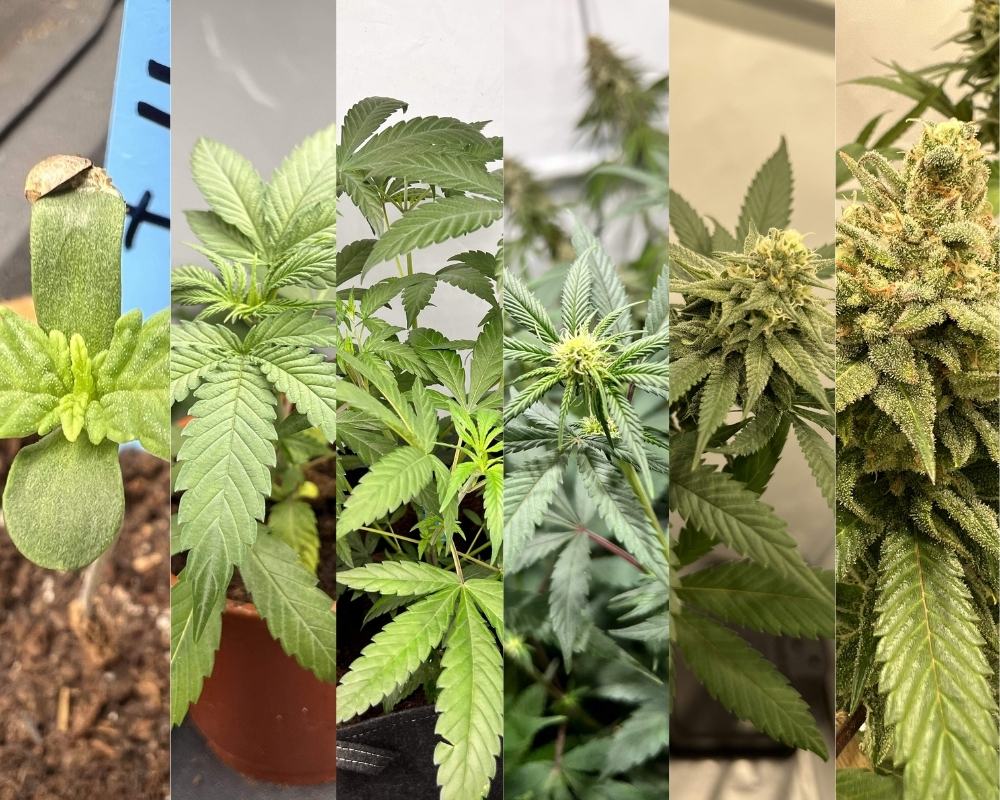
Weekly Guide For Autoflowering Cannabis Seeds
When cultivating cannabis through the use of autoflowering cannabis seeds, the expectations and outcomes you encounter will be different from traditional seeds. To better understand what to expect from your autoflowering experience, we are going to break down the process week by week.
Week 1 – Beginning Germination
While the duration for each cycle of autoflowering seed will change, the basics are going to be the same and it all begins with germination. To properly germinate your autoflowering cannabis seeds, opt for the paper towel technique that can lead to sprouting within one to five total days. Carefully monitor for high levels of humidity to induce germination.
Week 2 – The Seedling Stage
When your autoflowering seed finally sprouts and begins to grow, it will have entered its seedling phase. The seedling phase will ask for heightened nutrient levels, providing roughly half the dose that a regular feeding schedule will demand. Seedlings need to be treated carefully so as not to induce shock in their system.
Pro Tip – Cover your seedling with a clear plastic bowl to maintain heightened humidity levels. Keep the light as close to the seedling as possible without burning the plant, to prevent stretching.
Week 3 and 4 – The Veg Stage
Once we enter the vegetative stage, it is time for plants to grow roots and begin to grow vertically. During this stage, you can expect your plant to hit roughly six inches in height. To maintain proper growing efforts, try to focus on Low-Stress training by shaping the size, height, and shape of the plant.
There are a few ways to employ Low-Stress Training techniques, including
- Secure Branches – Use special ties or tape to secure the tallest branches of your plant to the edge of your pot. This will keep the canopy of the plant lower, helping to create more of those large colas.
- Reduce Humidity & Temperature – Now we need to take special control of the growing environment for our plants. Keep the relative humidity levels of the room to roughly 50% throughout the veg cycle. Temperature levels should remain around 68 degrees.
Monitor your plant throughout this process for any signs of stress. You’ll likely see pistils begin to emerge during the final weeks of the veg process.
Weeks 5 & 6 – The Flowering Stage
Now we are ready for the main event: the flowering stage. Flowering will begin with an autoflowering plant regardless of the stage that the plant is in. After a certain amount of time, your autoflowering cannabis seeds will begin to flower, developing pistils within the branches as the plant begins to stretch.
Pro Tip – During the flowering phase, you will need to improve the level of water that you feed your plant as well as the nutrition that you treat the soil with. Flowering plants will need roughly 1l of water during the flowering stage every three days.
Week 7 – Monitor Your Plants
Now is the time to drop your humidity levels to around the 40% mark. Monitor your plants for any signs of stress or pests. Continue to utilize low-stress training techniques. Make sure to treat blooming sites by tucking any leaves that may block their development.
Week 8 – Flush & Defoliate
Flushing is ideal to help reduce the levels of potential contaminants in your plant before harvest. While there is no hard evidence to suggest that flushing a plant can change its makeup, it has become part-and-parcel of the experience for seasoned cannabis cultivars. This process should be undertaken by professionals only.
Deciding whether or not to defoliate your plant will depend on the strain. Support branches that have been weighed down by heavy colas. Most defoliation should be done in the early stages of flowering.
Week 10 – The Harvest
You’ve made it to the end of your autoflowering experience. By this point in time, cannabis buds on your plant should be coated in milky-white trichomes. From here forward, you will be ready to chop, harvest, dry, and cure your crop.
Benefits of Autoflowering Cannabis Strains
By this point in time, it is pretty easy to see why autoflowering cannabis seeds are continuing to grow in popularity. They take much of the guesswork out of cannabis cultivation by making it a streamlined experience.
What other reasons are there for growing autoflowering seeds?
- Small and Controlled – Autoflowering strains are smaller in size, easier to control, and harder to detect. Whether you are growing indoors or outdoors, autoflowering cannabis seeds can give you the tools you need to succeed.
- Quick Growth, High Yield – More resistant to pests and diseases, autoflowering strains grow quickly unencumbered by many of the downfalls of regular seeds. This leads to quick growth and a high-yielding plant in as few as 10 weeks.
- Simply Lighting – Without any need to change your lighting schedules, you can set a 12/12 schedule and keep it throughout. With that being said, most auto-flowering pros tend to keep their plants on a 24/7 light cycle to truly boost the process of photosynthesis.
Whether you are a seasoned cannabis cultivator or a newcomer to the industry, the right autoflowering cannabis seeds can lead you to success.